Home » Recipes » A Basic Quiche Recipe (add any filling of your choice)

A Basic Quiche Recipe (add any filling of your choice)

Quiche makes the perfect hot meal to share with a crowd. It’s filling, savory, and full of delicious flavors.

Here’s the thing about quiches… they’re one of the only meals you can serve for breakfast, lunch or dinner, without hesitation. There’s no slaving in front of the stove for hours, and you can use up your leftovers in them.

Not only will you and your family love our no-fail quiche recipe below, we invite you to check out our blog post How to Make a Killer Quiche, where every quiche question you can think of has been answered.

What are the best fillings for my quiche?

This is the fun part. Think outside the cheese, and mix and match however you want. There are NO hard-and-fast rules here.

Since there are so many fillings you can flavor your quiche with, we can’t say we have a favorite. Instead, we love to use seasonal veggies or sift through our leftovers in the refrigerator. Honestly, almost any vegetable and meat taste good in a quiche, so use your leftover meat, shellfish, cheese, vegetables and play around with herbs and spices.

The ratio: The general rule of thumb is for every 4 large eggs, use 1 cup of milk, 1 cup of cheese and 2 cups total of vegetables and/or meat.

Should I pre-cook my fillings?

Yes, yes and YES! Except for tomatoes and spinach, cook or sauté your fillings ahead. This can be done all together in one pan.

This is one step you should take the time to do because it will take your quiche to a whole new level of deliciousness.

Pre-cooking your ingredients allows you to add flavor, decrease excess moisture in your baked quiche and reduce the baking time.


Is it necessary to dry my fillings?

YES! Wet ingredients will make for a soggy quiche, which is absolutely heartbreaking.

  • Meats should be pre-cooked and patted dry. For example, bacon, sausage, ham and ground beef should be dabbed with paper towels after they’re cooked to remove excess grease.
  • Veggies should be sautéed. When sautéing your veggies, try adding a little minced garlic and a pinch of salt for a burst of flavor. If your veggies have excess moisture, you can pat them dry too.
  • Cherry tomatoes tend to work better than larger tomatoes, as they’re less watery, but you’ll still want to remove the seeds and pat them dry to eliminate excess moisture.

Prep ahead

So we can toss our quiche together in 10 minutes flat, we often chop our veggies and cook our protein (such as sausage) on our meal prep day. Pre-chopping, cutting and cooking ingredients really helps to reduce stress and simplify meals throughout the busy week. We know, we know, we’re always talking about meal prep, but it truly is the holy grail to healthy eating!

Freezer-friendly

If you frequent FULLforLife, you know we’re a huge advocate and fan of batch cooking whenever possible. At this point, we make double batches of 75 percent of our meals to simplify the weeks to come. While the ingredients are out and the dishes are dirty, why not make more to use throughout the week or to freeze for future meals? This quiche is no different! It freezes and reheats well.

Print
clock clock iconcutlery cutlery iconflag flag iconfolder folder iconinstagram instagram iconpinterest pinterest iconfacebook facebook iconprint print iconsquares squares iconheart heart iconheart solid heart solid icon

A Basic Quiche Recipe (add any filling of your choice)


5 Stars 4 Stars 3 Stars 2 Stars 1 Star

No reviews

Description

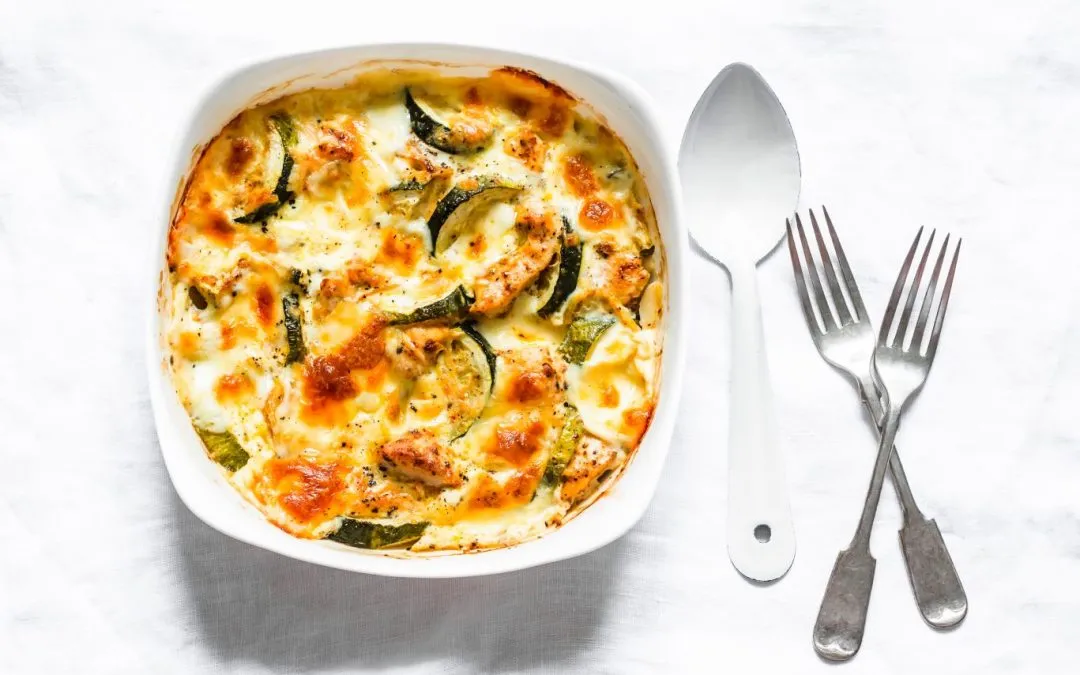
Everyone loves a savory quiche and this recipe will not let you down. With only a few minutes of hands-on time and the ability to get creative with your fillings, you just can’t beat this simple quiche. It’s great served at a brunch buffet with our amazing Maple-Sweetened Banana Muffins or Pumpkin Spice Muffins, or as a light dinner with a green salad.


Ingredients

Scale

Instructions

  1. Preheat oven to 400 degrees.
  2. Press pie dough into 9-inch glass pie plate. Trim any excess and flute the edges.
  3. BLIND BAKING (optional): If you plan on pre-baking your crust, carefully line your pie dough with parchment paper or aluminum foil. Add pie weights or dried beans on top of the parchment paper or foil to weigh down the pie crust (this prevents the center from puffing up or the sides from shrinking down). Once the oven reaches 400 degrees, bake until the bottom of the crust is just beginning to brown, about 6-8 minutes. Remove from the oven and allow your crust to cool. (Prepare your fillings during this time.)
  4. Cook desired fillings in a small amount of extra virgin olive oil and garlic. Veggies should take approximately 5 minutes; meats, poultry and shellfish should be fully cooked. Remove from heat, pat off excess grease or moisture, mix together and set aside.
  5. In a bowl, beat eggs and milk. Brush a small amount of this mixture on your pie crust. Add cheese, salt and pepper to the remaining egg mixture. Stir to combine and set aside.
  6. Spread your fillings evenly on the bottom of the pie crust. Pour egg and cheese mixture on top.
  7. Bake on middle rack for 40 minutes or until set.
  8. Allow quiche to set for 10-20 minutes before cutting into it.

Notes

Always check for FfL-friendly ingredients.

We recommend organic ingredients when feasible.

  • Category: Recipes
  • Method: Prep Now, Cook Later
TAGS: Holiday

Treat Yourself to a Weekly Wellness Boost!

Unlock VIP access to self-care secrets, delightful surprises, and a dash of healthy food inspiration. Join us now and let the pampering begin!

"*" indicates required fields

This field is for validation purposes and should be left unchanged.

You May Also Enjoy

Leave a Comment

0 Comments

Submit a Comment

Your email address will not be published. Required fields are marked *

Recipe rating 5 Stars 4 Stars 3 Stars 2 Stars 1 Star

Hi beautiFULL, We’re Pam and Kalie

If you want your family to live a healthier life, you’ve come to the right place! Our simple wellness practices have been handed down for three generations and are the secret weapon to staying healthy and sane.

Learn More

Categories

Archive

GET YOUR FREE GUIDE

Real Food Crash Course

Learn how to cut out processed food in a realistic and manageable way.

Free Guide Food – Real Food Crash Course

"*" indicates required fields